… we come to the end of another year. And no, this is not a post about the next chapter of Sex and the City, nor my cats! But I will tell you about the biggest visible change to Poseidon in 40 years…
We ended up staying in Townsville for about six months (instead of the original three we planned) and during this time, we took several trips to Magnetic Island and we cruised up to Dunk Island with our son and his girlfriend. Check out my blog – Should you serve bolognaise with rice? – for details and photos of that cruise.
But we’ve also completed a number of project on board Poseidon, and I thought I’d share with you the improvements we’ve made:
Looking back, we’ve done a lot. Who said we might might get bored in retirement? Oh wait, I think that was me!!
Replaced the helm pumps
Back in April this year, when I wrote the blog Introducing our extra hand at the helm, I mentioned that it was an important preparation step in our longer-term plan to upgrade the flybridge and pilot house helm pumps. The helm pumps are what the steering wheels operate to move the rudders. Our helm pumps were 40 years old and the style of helm pump, called a Capillano 250, had a specific part in its system design called the “Uniflow 50” valve. This valve hasn’t been manufactured since the late 1980s and was near impossible to replace.
We’ve now, with help from a mechanic, replaced these pumps and gotten rid of this “single point of failure”, which in something as important as your steering is a very good thing. We also had the steering ram (moves the rudders) removed and serviced and it’s like new. Well, initially it didn’t work but after a trip back to the company who serviced it, it’s now like new!
When we took Poseidon out and tested to ensure everything was working, we certainly noticed she is more responsive and easier to steer.
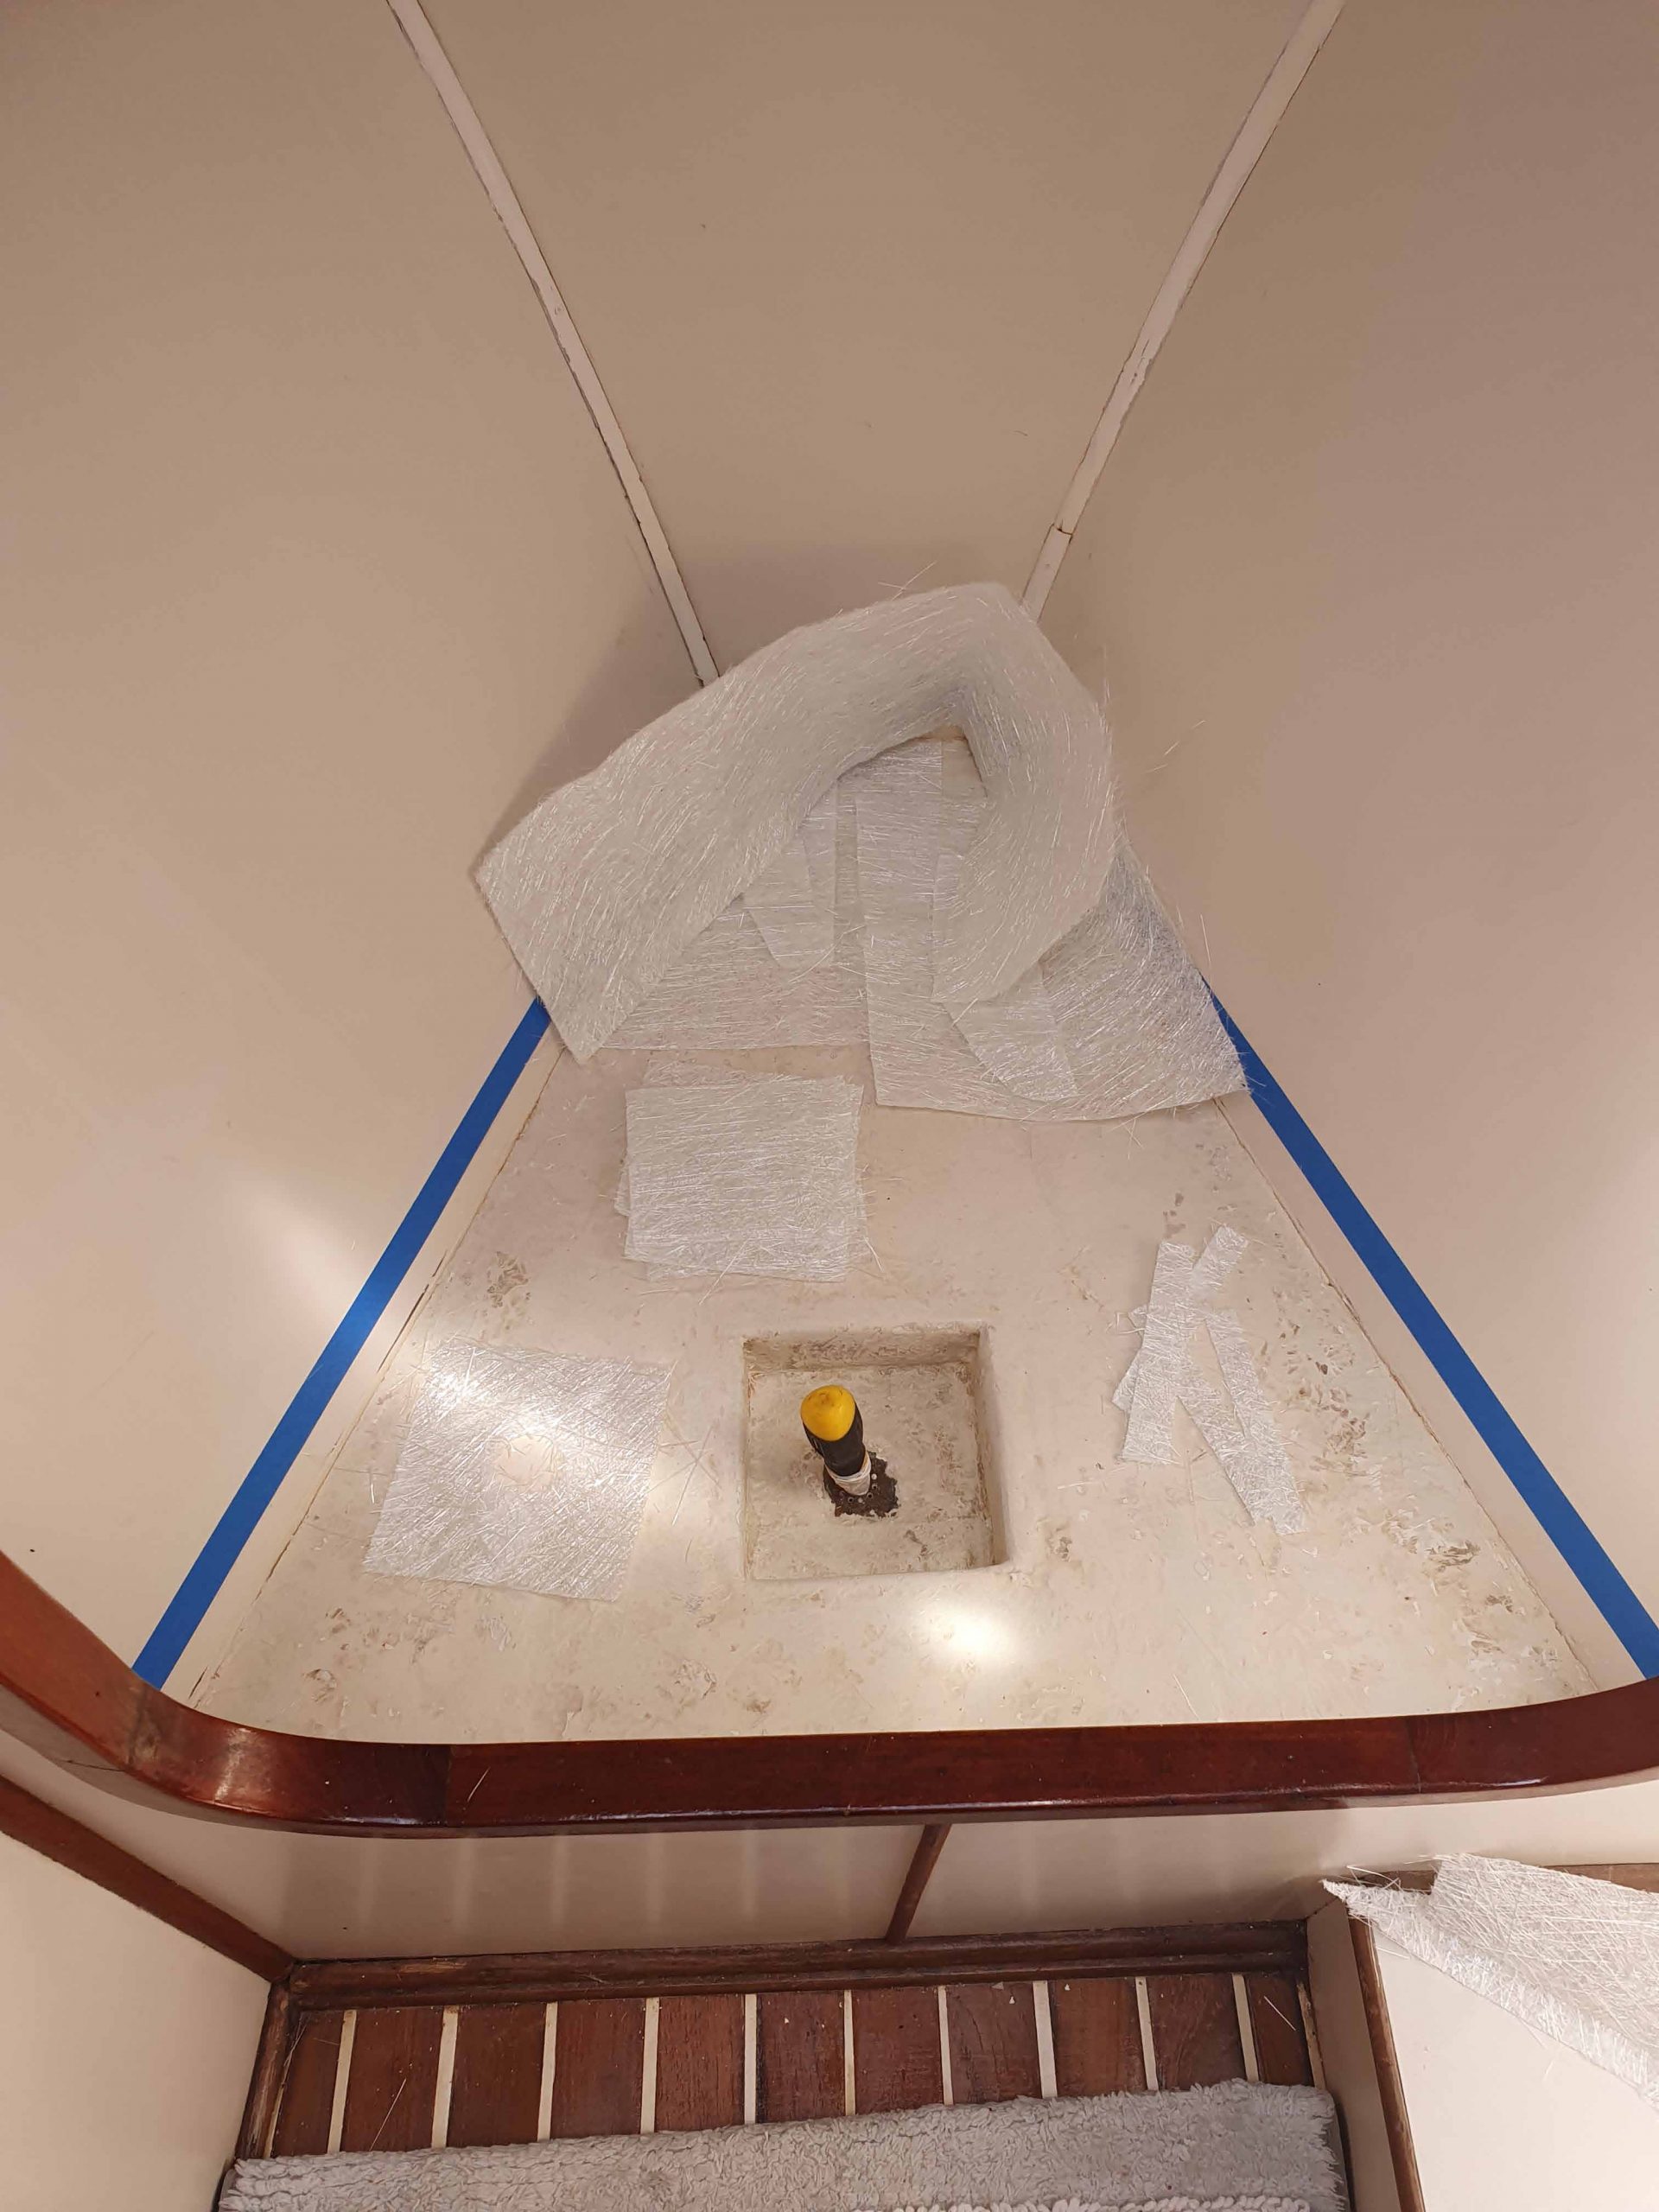
When we had our flopper stoppers installed – see We’ve got Flopper Stoppers – the installer suggested we beef up the hollow sides of our boat where most of the compression is experienced. So we had a local shipright do this for us. He cut a larger hole on the inside of the boat, filled it with a Thermolite board, which is light-weight, rot free, and very strong. He then placed a piece of fibreglass over the top. Initially we weren’t too sure we liked how it looked, but now we’re used to it.
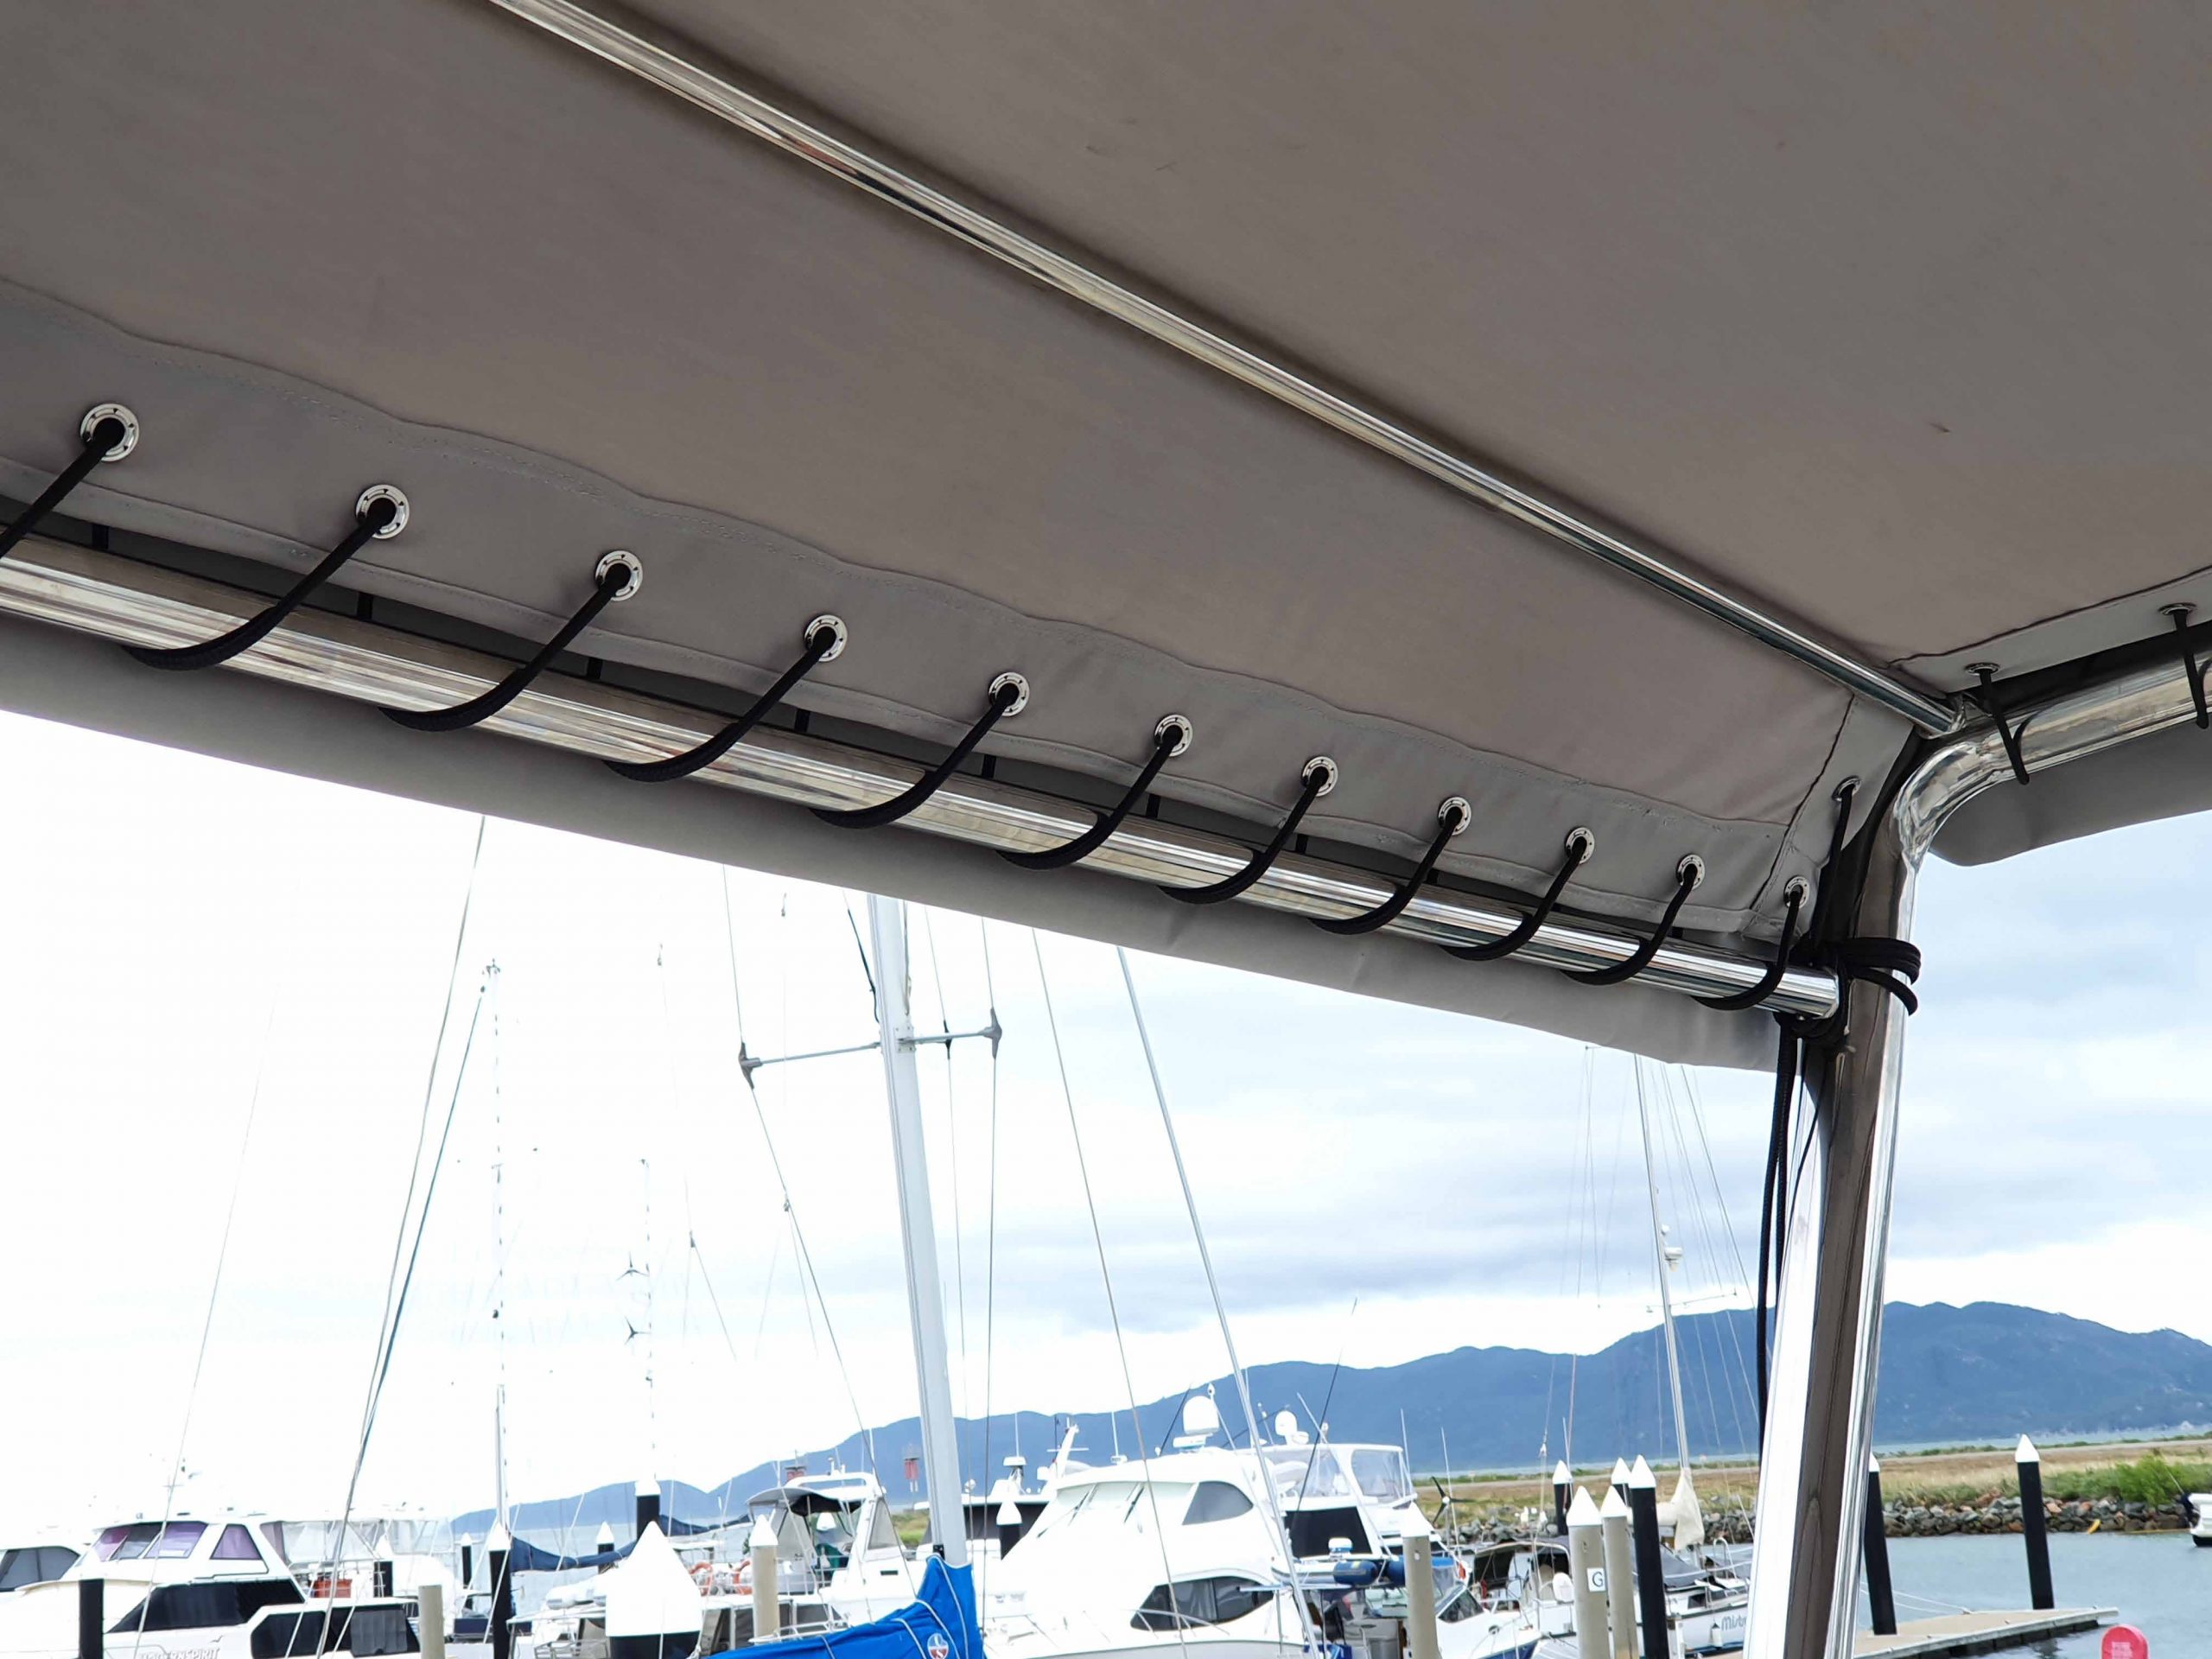
When we decided to stay in Townsville longer (and into late spring/summer), we decided to make more shade covers for our saloon. Shade and blocking out direct sun is critical to try to keep the living spaces cooler. They also provide privacy during the day and keep the cats in!
If you’re not familiar with the weather here, it averages 32C daily in summer. It generally doesn’t get that much hotter, but being a tropical climate, it does get very humid.
OK, it doesn’t sound like much but getting 12 x ~30kg 6v batteries out of the engine room, off the boat, to the car, off to the metal scrap yard, then buying 12 replacements, bringing them back to the marina, getting them onto the boat and into the engine room was a pretty significant achievement.
Also, due to the size of our car and the weight of the batteries, we could only do six at a time!
Then Robert bought two “group 31 starting batteries” that we now use exclusively to start the port engine.
The black Sikaflex between the teak boards on the side and aft decks has been weathering and we decided to replace it with the epoxy and then oil the decks, to make them more water-resistant and reduce the tannin stains on the sides of our boat. We prototyped the process on the lazarette covers first, then improved it as we went along. We still have some more deck to do but we’ll be finished in first quarter 2022!
In summary the process involves these steps and it’s a real team effort:
Robert removes old black Sikaflex from between the boards
I sand the gutters between the boards and paint with a primer
Robert sands the deck ready for new epoxy
I tape the boards, lengthwise, and Robert inserts the new epoxy
We remove the tape before the epoxy dries too much
It was the dry season when we arrived in Townsville, so Robert took the opportunity to fix some leaks.
He replaced the bathroom and pilot house hatch covers. He removed the old covers from the frames and replaced them with new tinted acrylic. The main change to the previous process he followed was applying a specific Sika Primer, which is intended to improve bonding before sticking the new hatch cover to the frame using Sikaflex 295UV sealant. We’ve now had some decent downpours and so far so good. We still have a little more to do, such as painting around the outside edge of the hatches.
We also had a water leak in the galley, which had been annoying us for many years! After working through many possible fixes, which helped but didn’t completely stop the leak, Robert re-sleaved a pipe that runs beneath the starboard side flybridge seat. Since doing this, no more leaks, so we can now clean it up and we’re done.
The shower base has always annoyed me! It was roughly painted by previous owner and due to moisture and heat, was always getting mouldy. In addition, the teak grate that covers the base had degraded and needed to be sanded and re-oiled. I decided to tackle this project myself.
I scraped, sanded and removed the old paint from the shower base and fibre-glassed it with two applications. I then sanded the fibreglass and applied two coats of a two-pack epoxy primer paint.
I sanded the teak grate, both sides and all bits in between, then applied multiple coats of Cabot’s CFP floor oil.
Ever since moving aboard, I have frequently knocked the boat hooks off their attachment points. One evening, while enjoying my second glass of wine, I realised that if I turned the hook 180 degrees, this problem would go away (because of the position of the attachment points!)
As a precursor to the biggest visible change to Poseidon in 40 years, I decided to make a new cover for our bimini frame. Below I describe how I covered the bimini frame. I also referenced a YouTube video – how to make a 3 bow bimini top – by Sailrite.
Rebuilding the bimini frame and making the pattern
Because of the height and access to the original bimini frame, Robert dismantled it and rebuilt the frame on the deck. This meant it was easier to create the pattern for it, rather than try to use the existing bimini as a pattern, which was my plan! We used a lot of tape and marked the frame so we knew exactly where the material should go. I was also lucky that one of the people we’d approached to make the bimini, while she couldn’t help, did give me some good patterning material.
They say “measure twice, cut once” and I certainly measured multiple times! Luckily, I was able to use the marina’s social room to cut out the fabric. This was great because not only was there plenty of space, it also had a sturdy long table and was air-conditioned! I cut the fabric by using an electric hot knife and this prevents the fabric from fraying,
I sew with my machine on the galley (kitchen) bench and standing. I’m quite used to this now and can manage to get a lot of fabric laid out next to the machine in preparation for sewing. I also decided to have a go at making the bias binding for the edges, and it turned out very well.
This cover differs from the previous one I made about 5 years ago insofar as it has zippers to hold the bimini cover on to the bows and is therefore easy to zip off and on. The previous one didn’t have zippers, it had pockets and we needed to take part of the frame apart to slide it on. While not part of the video, we also decided to add some extra tabs/covers to go over the zippers and help strengthen them where there’s tension at the zipper start and stop points. We’re very happy with the result.
Made the biggest visible change to Poseidon in 40 years!
About a month after arriving in Townsville, we decided to have a new (bimini) frame constructed on our flybridge deck. This would provide us with a more usable shaded space and also help to shade the saloon below. The project involved two stages, the first building the stainless steel structure, which we contracted out, and second stage of covering it.
The construction of the stainless steel bimini took a lot longer than expected. Well, it didn’t take so long once it got started, but there were frequent delays and there seems to be a lack of tradespeople available in Townsville. However, this was finally finished in mid December. At first I wasn’t going to make the cover but again, being unable to find someone with time available, decided to give it a go.
Construction of the frame is finished
The new stainless steel frame is finally finished. The end arch, which spans the rear of the flybridge, is 20cm diameter and screws through the deck. Then nine stainless steel poles are braced between the radar arch and this end arch. The centre pole and the last two side poles have a greater diameter than the other six, just to add more support. And there’s a pole between the end arch and radar arch that helps brace all the poles together.
On the plus side, the frame was symmetrical so I only needed to create a pattern for half of the structure. On the negative side, I don’t like climbing up ladders on a deck with the boat gently rocking and the wind was stronger, so this added to the degree of difficulty! Once again, it was a team effort because without working together, we couldn’t have made the pattern.
I patterned using the same techniques as for the original bimini cover and I cut the material out in the marina social room. But I assembled and sewed it on the boat and once the two sides were joined it was a lot of fabric!
First iteration done
Here are some photos of the first iteration, prior to adding the hang downs
Hang downs added, some tweaks to the velcro straps down the centre and finally finished
I added hang downs, strips of fabric along the sides and back, for two reasons. Firstly, to help protect thread/grommets and lines from the sun. Secondly, to provide a seam should we ever want to add shade cloth or something to the sides/end. Personally, I was thinking of some chiffon-like soft fabric and offering to conduct intimate memorial services for loved ones from the boat then scattering the ashes. I don’t mean to be morbid, but I do have a statement of attainment to conduct a funeral service.
We also treated ourselves to some outdoor, reclining chairs for our wonderful new space.
Because I wasn’t too busy for a while, due to delays with our new structure being ready to cover, I painted my son’s very long fence, so long I couldn’t really get it all in the photo!
Early January 2022 weather permitting, we’re heading south to Airlie Beach where we’ll spend a couple of months exploring the Whitsundays. As I mentioned in my blog – Too many islands, too little time – we only had a “taste-tester” when we were heading north from Mackay (back in June) so it’s time to see more of the 70+ islands on offer.
Hi Pam, great post and a most entertaining and informative read. We have completed our year of modifying and getting to know our trawler/cruiser ‘Sagitta’ and are scheduled to depart Port Stephens on Saturday heading North to start our circumnavigation. We expect this will be a way different experience than when we met you on our previous vessel, the sloop ‘Light Spirit’. We also expect that we will be following much of your track North of Townsville and we hope to catch up with you again, probably in the Whitsundays. Best wishes.
Wow! You’ve certainly been busy since l last saw you in Yeppoon! Sounds like you are having an awesome time exploring Queensland. All the very best for 2022! Claire
You two have been busy. Certainly time to relax a bit.
Have a wonderful time in the Whitsundays. May 2022 bring you lots more adventures.
Peter and Dagmar
As always, you’ve done a brilliant job. You’ve done way more home improvements than we seem to have time for! You also both look so fit and well and like you’re having a good time.
Hope you’ll put your feet up and enjoy welcoming in the new year.
I agree with the other comments! I’m exhausted just reading what you’ve been up to!
A great read as always Pam!
Hope you had a great Xmas & Happy New Year!


14 Responses
The new bimini looks great!
Hi Pam, great post and a most entertaining and informative read. We have completed our year of modifying and getting to know our trawler/cruiser ‘Sagitta’ and are scheduled to depart Port Stephens on Saturday heading North to start our circumnavigation. We expect this will be a way different experience than when we met you on our previous vessel, the sloop ‘Light Spirit’. We also expect that we will be following much of your track North of Townsville and we hope to catch up with you again, probably in the Whitsundays. Best wishes.
Wow! You’ve certainly been busy since l last saw you in Yeppoon! Sounds like you are having an awesome time exploring Queensland. All the very best for 2022! Claire
You two have been busy. Certainly time to relax a bit.
Have a wonderful time in the Whitsundays. May 2022 bring you lots more adventures.
Peter and Dagmar
Happy traveling for 2022 with your island hopping. By the way, I have a RabbitGoo harness for my dog. I didn’t know they came in cat size.
As always, you’ve done a brilliant job. You’ve done way more home improvements than we seem to have time for! You also both look so fit and well and like you’re having a good time.
Hope you’ll put your feet up and enjoy welcoming in the new year.
Hey Pam, I loved reading this. My Goodness. It’s an amazing transformation. Btw, I loved your little bit of graffiti on Regan’s fence 😉.
I agree with the other comments! I’m exhausted just reading what you’ve been up to!
A great read as always Pam!
Hope you had a great Xmas & Happy New Year!
That’s fantastic Pam…Enjoy and stay safe 😁
Wholly Molly I’m exhausted from reading all that. You two are a couple of go getters! I hope you had a great Christmas and a happy New Year!
Keep safe
Love your posts.
Helen and Billy
It’s exhausting just reading this blog! 🙂
But all looks awesome!
Happy New Year Pam and Robert!!
My god you have been busy. All worth every cent. Well done! Happy New Year to you both. X
My goodness guys you are supposed to be relaxing 🤣. The bais work is great Pam.
You both have been busy. Great work.